Injection Moulding
Step 1: Product Design
Design is one of the most important facets of the production process because it’s the earliest opportunity to prevent expensive mistakes later on. There are many objectives to design for: function, aesthetics, manufacturability, assembly, etc. The right design is one that accomplishes the required objectives to a satisfactory level, but it may take a lot of creativity to get there. Product design is most often accomplished with computer aided design (CAD) software, like SolidWorks. Proficiency with CAD software is vital because it allows for quicker iterations and more accurate prototyping if necessary.
Some specific ways to avoid costly mistakes during the product design process are to plan for uniform wall thickness whenever possible, and to gradually transition from one thickness to another when changes in thickness are not avoidable. It is also important to avoid building stress into the design, such as corners that are 90 degrees or less.
Step 2: Mold Design
After a looks-like, feels-like design has been tested and slated for further production, the mold (or die) needs to be designed for injection mold manufacturing. Molds are commonly made from these types of metals:
- Hardened steel: Typically the most expensive material to use for a mold, and generally the longest-lasting (which can drive down price per unit). This makes hardened steel a good material choice for products where multiple hundreds of thousands are to be produced.
- Pre-Hardened steel: Does not last as many cycles as hardened steel, and is less expensive to create.
- Aluminum: Most commonly used for single cavity “Prototype Tooling” when a relatively low number of parts are needed for testing. Once the injection molded parts from this tool are tested and approved, then a multi cavity steel production tool is produced. It is possible to get many thousands of parts from an aluminum tool but typically it is used for lower quantities.
- Beryllium-Copper alloy: Typically used in areas of the mold that need fast heat removal or where shear heat is concentrated.
Just as with overall product design, mold design is another opportunity to prevent defects during the injection molding process. Here are some examples of how poor mold design can be a costly mistake:
- Not designing the proper draft: This refers to the angle at which the finished product is ejected from the mold. An insufficient draft can lead to ejection problems, costing significant time and money.
- Improperly placed or sized gates: Gates are the openings in a mold through which thermostat or thermoplastic material is injected. Each will leave a vestige (scar), which can create aesthetic or functional problems if not properly placed.
The number of parts (cycles) required, as well as the material they will be made of will help drive decision-making as to how and with what materials to create the mold.
Step 3: The Manufacturing Process
When a product has been properly designed, approved, and die cast, it’s time to start the actual manufacturing! Here are the basics of the injection molding process…
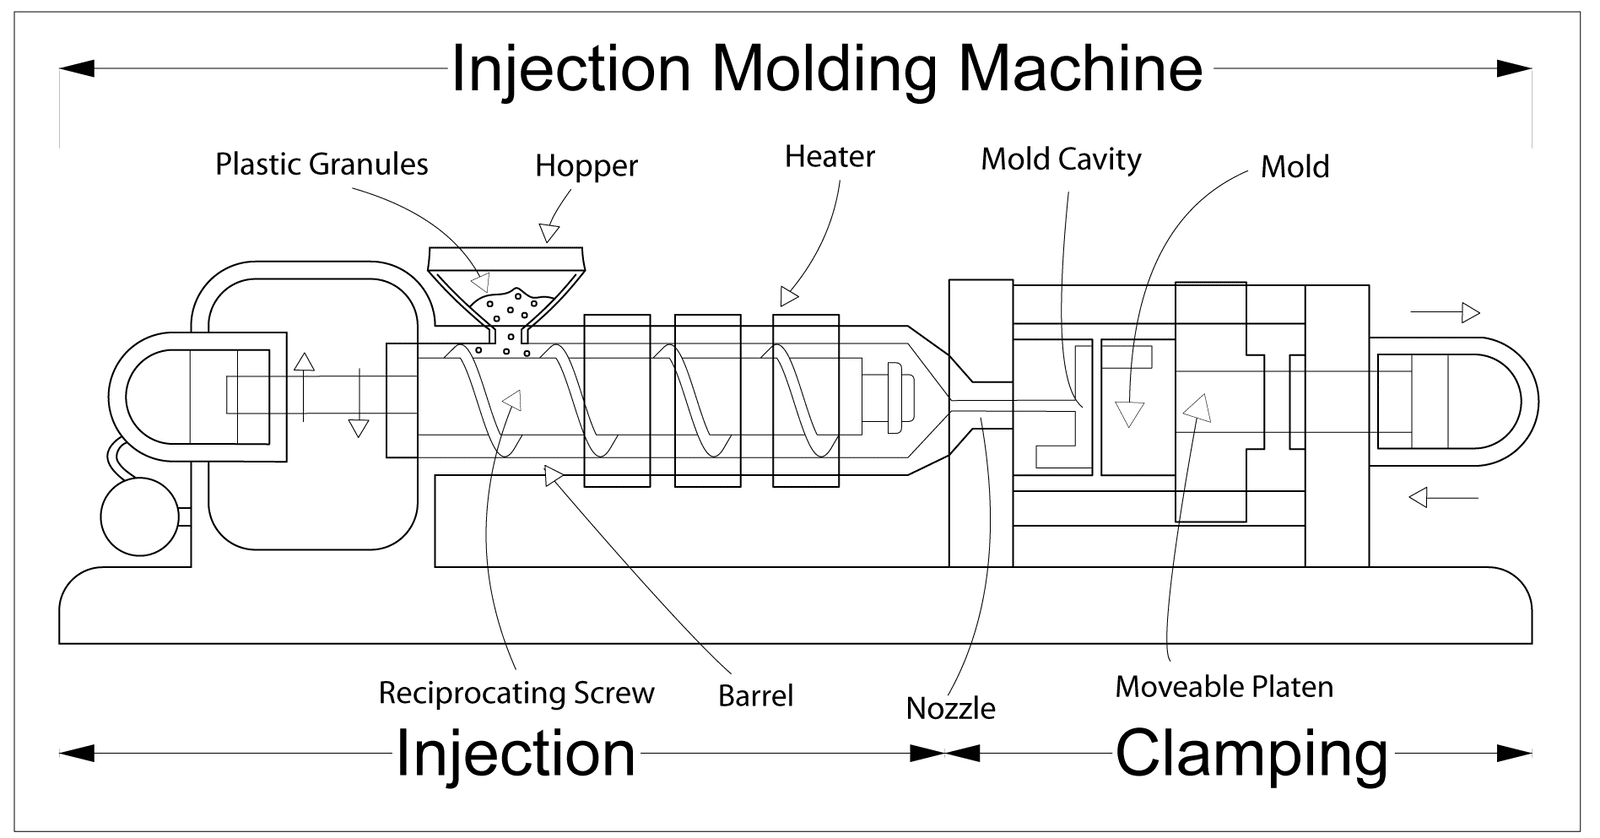
Thermostat or thermoplastic material in granular form is fed through a hopper into a heating barrel. The plastic is heated to a predetermined temperature and driven by a large screw through the gate(s) and into the mold. Once the mold is filled, the screw will remain in place to apply appropriate pressure for the duration of a predetermined cooling time. Upon reaching this point, the screw is withdrawn, the mold opened, and the part ejected. Gates will either shear off automatically or be manually removed. This cycle will repeat over and over, and can be used to create hundreds of thousands of parts in a relatively short amount of time.
Advantages of Injection Moulding
Advantages of Injection Moulding
Disadvantages of Injection Moulding
Disadvantages of Injection Moulding
Because of the massive manufacturing scale usually involved in injection molding, small mistakes can have massive consequences - financially and logistically. While the margin of error is small, the implications are substantial.
Small Design Errors Have BIG Costs with Injection Molding
Upfront costs tend to be very high due to design, testing, and tooling requirements. If you are going to produce parts in high volumes you want to make sure you get the design right the first time. That is more complicated than you might think.
Getting the design right includes:
- Designing and then prototyping the part itself to specification, usually on a 3D printer and prototyped in a different material
- Designing an injection mold tool for an initial production round, to generate 300-1,000 prototypes
- Refining every detail in the injection molded prototypes before mass production.
Be Ready for High Tooling Costs for Injection Molding
Tooling is almost a project in and of itself and only one phase of the entire injection molding process. Before you can produce an injection molded part you first have to design and prototype a part (probably via CNC or 3D printing). Then you have to design and prototype a mold tool that can produce replicas of the part in volume.
Lastly, and typically after extensive testing in both of the aforementioned stages, you get to injection mold a part.
As you can imagine, all of the iteration required to get the tool correct prior to mass production requires both time and money. It is rare that you would prototype an injection molding tool. It does happen though, especially for parts that will be made in a multi-cavity tool.
When You Need to Adjust Your Injection Molding
Because tools are typically made out of steel (a very hard material) or aluminum it can be difficult to make changes. If you want to add plastic to the part you can always make the tool cavity larger by cutting away steel or aluminum.
If you are trying to take away plastic you need to decrease the size of the tool cavity by adding aluminum or metal to it. This is extremely difficult and in many cases might mean needing to scrap the tool (or part of the tool) entirely and start over. In other cases you might be able to weld metal into the cavity that is undesired.
Uniform Wall Thickness is Critical
Injection molding necessitates uniform wall thickness. Keeping walls from being too thick is important to prevent inconsistencies in the cooling process resulting in defects like sink marks.
A good rule of thumb is to keep walls less than or equal to 4mm thick. The thicker the walls the more material you will use, the longer the cycle time will be and the higher your cost per part will be.
Conversely, if wall thickness is any thinner than 1mm or so you might experience trouble filling the mold tool (resulting in gaps or short shots). Designers can compensate for this potentiality by using a material with a higher melt flow index like Nylon which is often suitable for walls as thin as 0.5mm.
Different manufacturing techniques like CNC don’t require uniform wall thickness at all.
Restrictions for Larger Injection Molds
Oftentimes large parts cannot be produced via injection molding as a single piece. This is due to the size limitations of injection mold machines and the mold tools themselves.
For an example of a large injection molded part, consider the shopping carts at Target. Although the machinery exists to mold very large pieces (e.g. 1000 ton presses roughly the size of a train’s caboose), using it is very expensive.
For this reason, objects that are larger than a typical injection molding machine’s capability are most often created in multiple pieces.
CNC machines have similar limitations regarding product size while 3D printing has even more limitations. CNC is limited to the travel and size of the bed in the milling machine while large 3D printed parts often need to be printed in multiple pieces and then bonded together.
Large undercuts require experienced design to be avoided and can often add costs to the project.
Applications suitable for Injection Moulding
Injection moulding is used to create many things such as wire spools, packaging, bottle caps, automotive parts and components, toys, pocket combs, some musical instruments (and parts of them), one-piece chairs and small tables, storage containers, mechanical parts (including gears), and most other plastic products available today.
Injection moulding is the most common modern method of manufacturing plastic parts; it is ideal for producing high volumes of the same object.


